
Hey there, and welcome to the Chameleon Quick Start Guide!
Below you'll find some simple tips to help you get started with your first Chameleon project. Each section will have a quick video you can watch too, but if you've got any questions that aren't covered here, click here to flick us an email.
Already know what you're looking for? Click the relevant link below:
-
1. Create and name a new project
Click here to watch the 'Create a new project' video, or follow the steps below.
Once logged in you'll see your projects dashboard. It might feel a bit empty to start, so let's change that!
To create a new project, click the Create Project button highlighted in the image below: 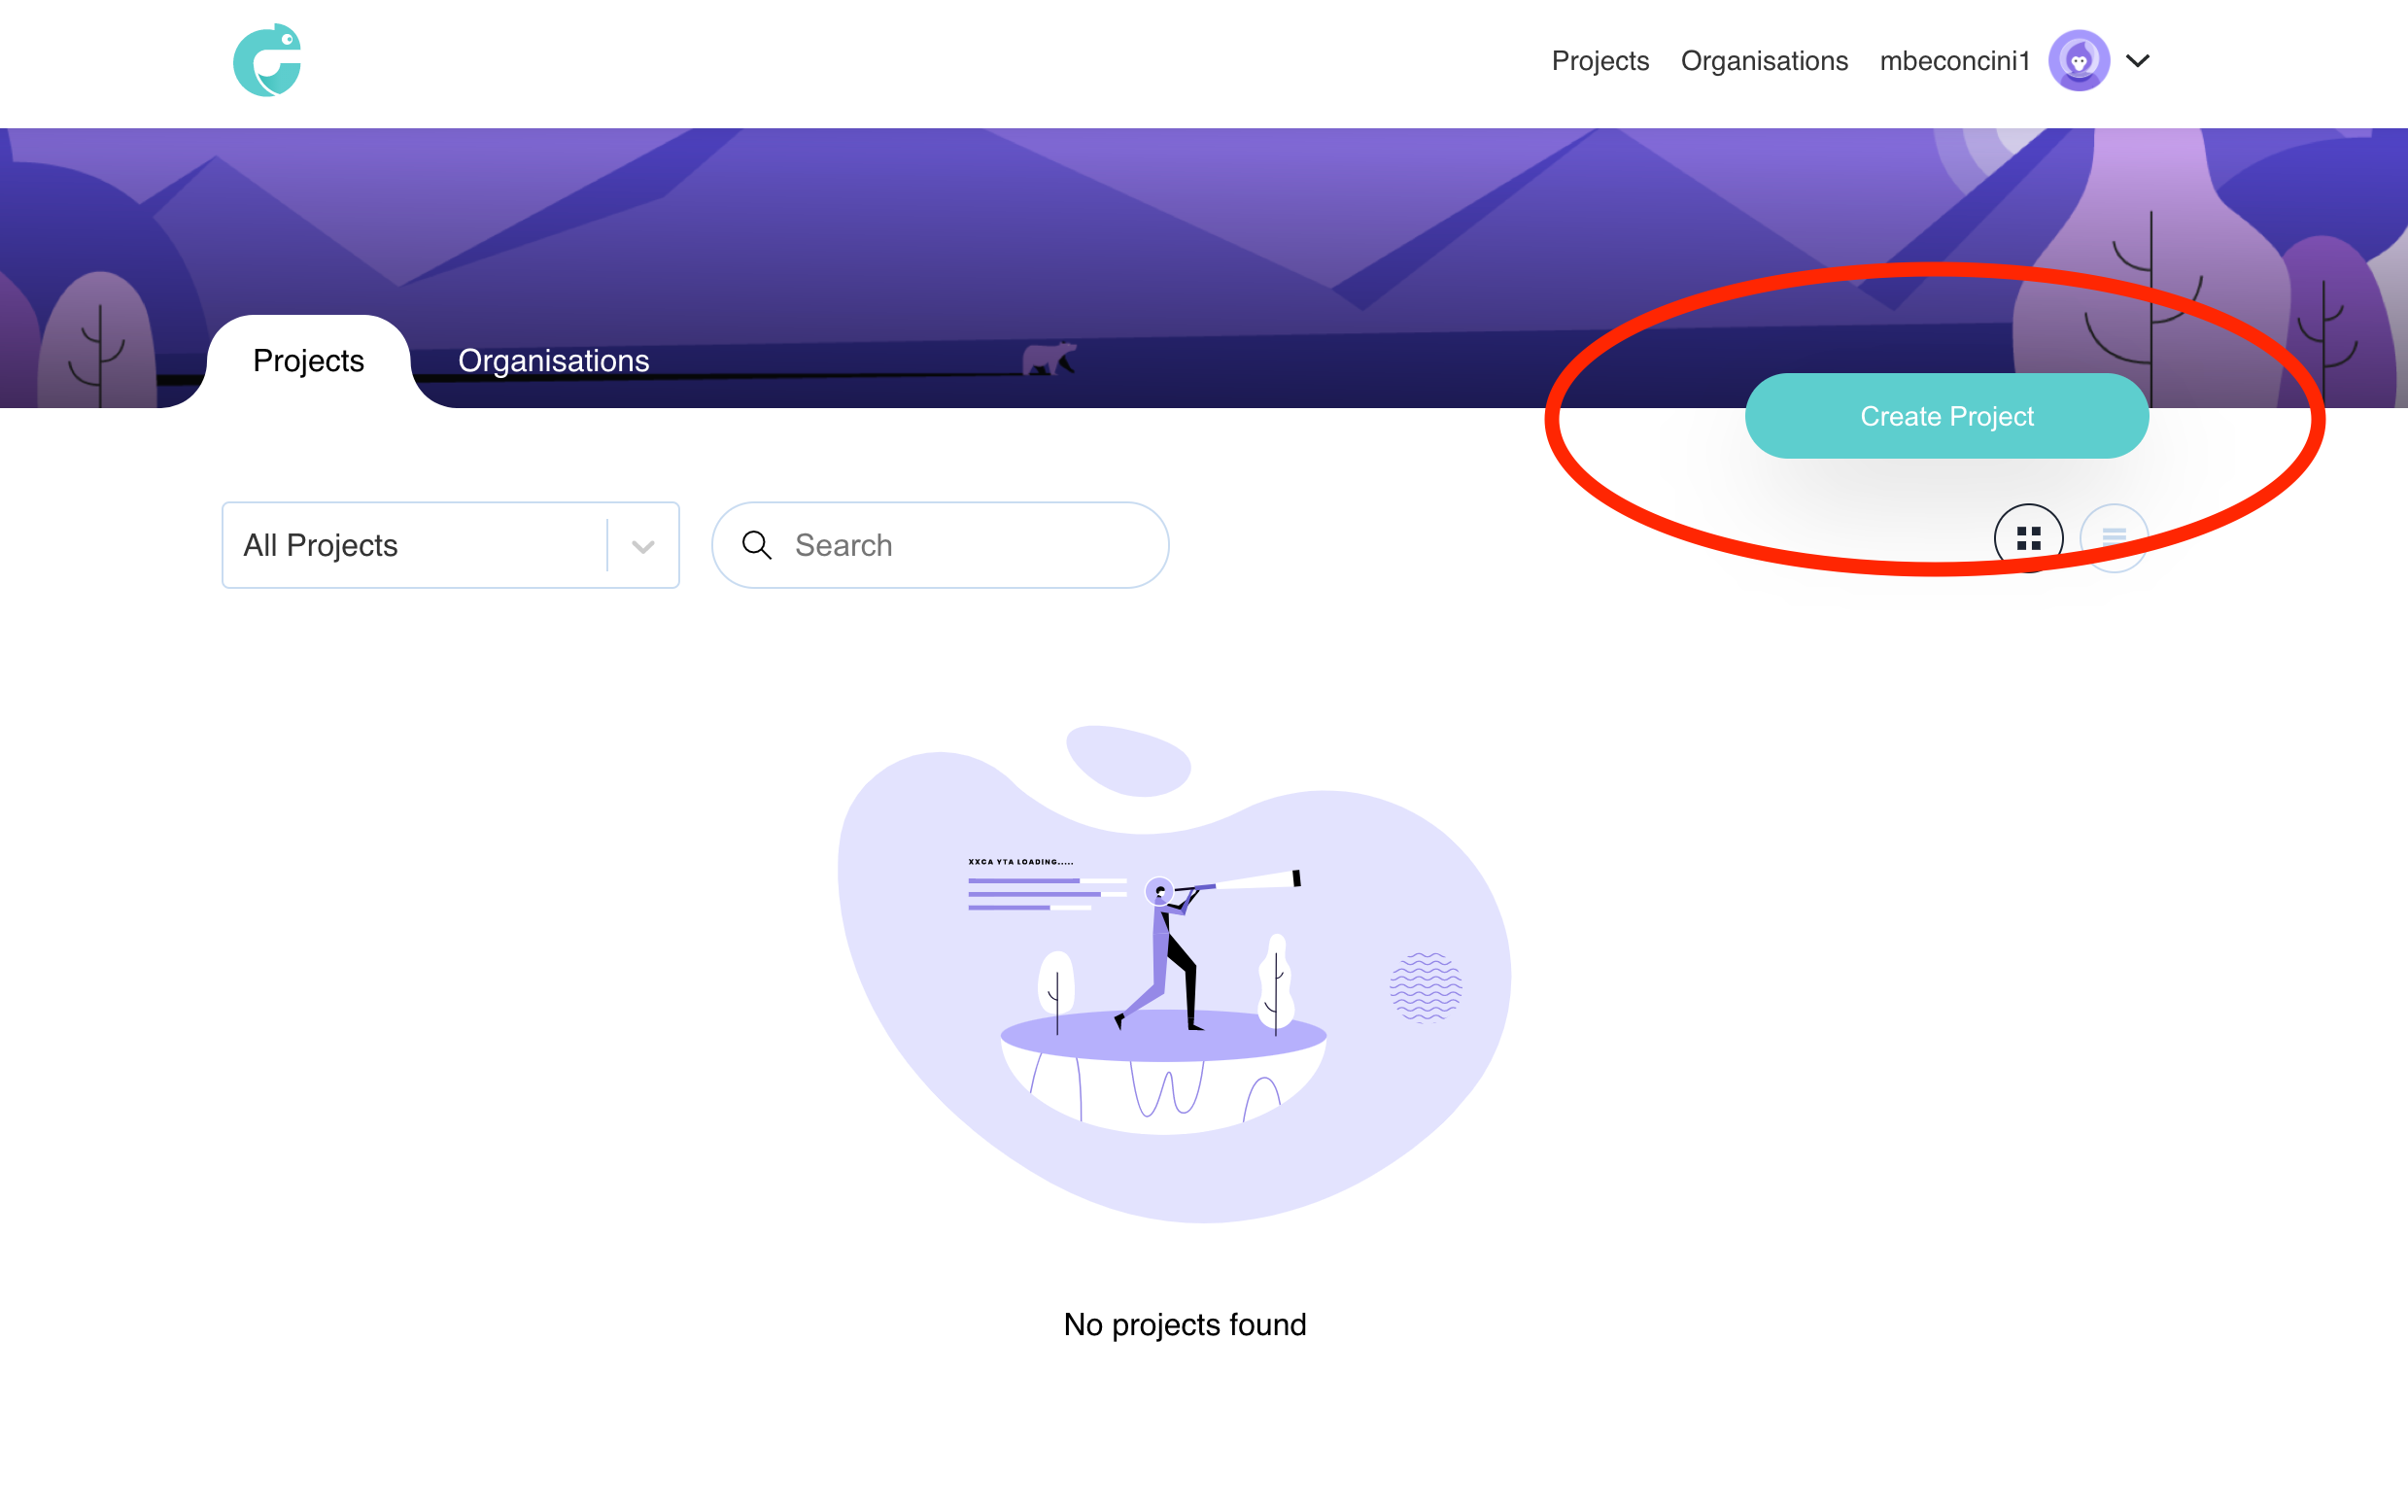
Once you've hit this button, a pop-up will appear. The pop-up will ask you to select a project owner, create a project name and add a project description, as shown in the image below.
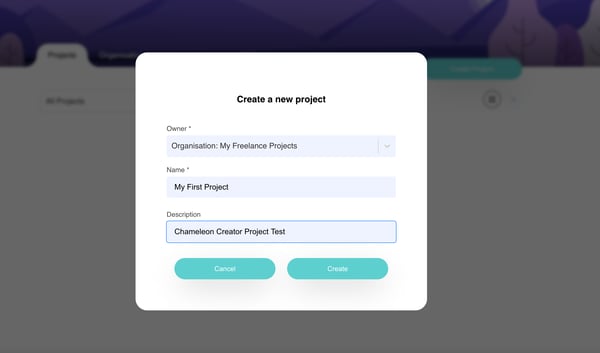
Owner: When selecting the 'Owner' of the project you will have a dropdown list of options. You can select yourself or your organisation. If you make yourself the owner, only you can see and edit the module, whereas if you select your organisation, everyone with an authoring licence will be able to.
Name: Give your module a name that represents the content e.g. Onboarding, health and safety etc.
Description: This is an optional field that you can fill in to give more detail about the project for your future reference.
Once you've filled out those fields, hit the Create button.
2. Change the theme/brand of your project
Click here to watch the 'Change the theme/brand of your project' video, or follow the steps below.
It's a good idea before you add any content to design your project's look and feel first. This way you'll have a base for each slide, rather than setting them up individually.
From within the editor, click on the Course settings button highlighted in the image below: 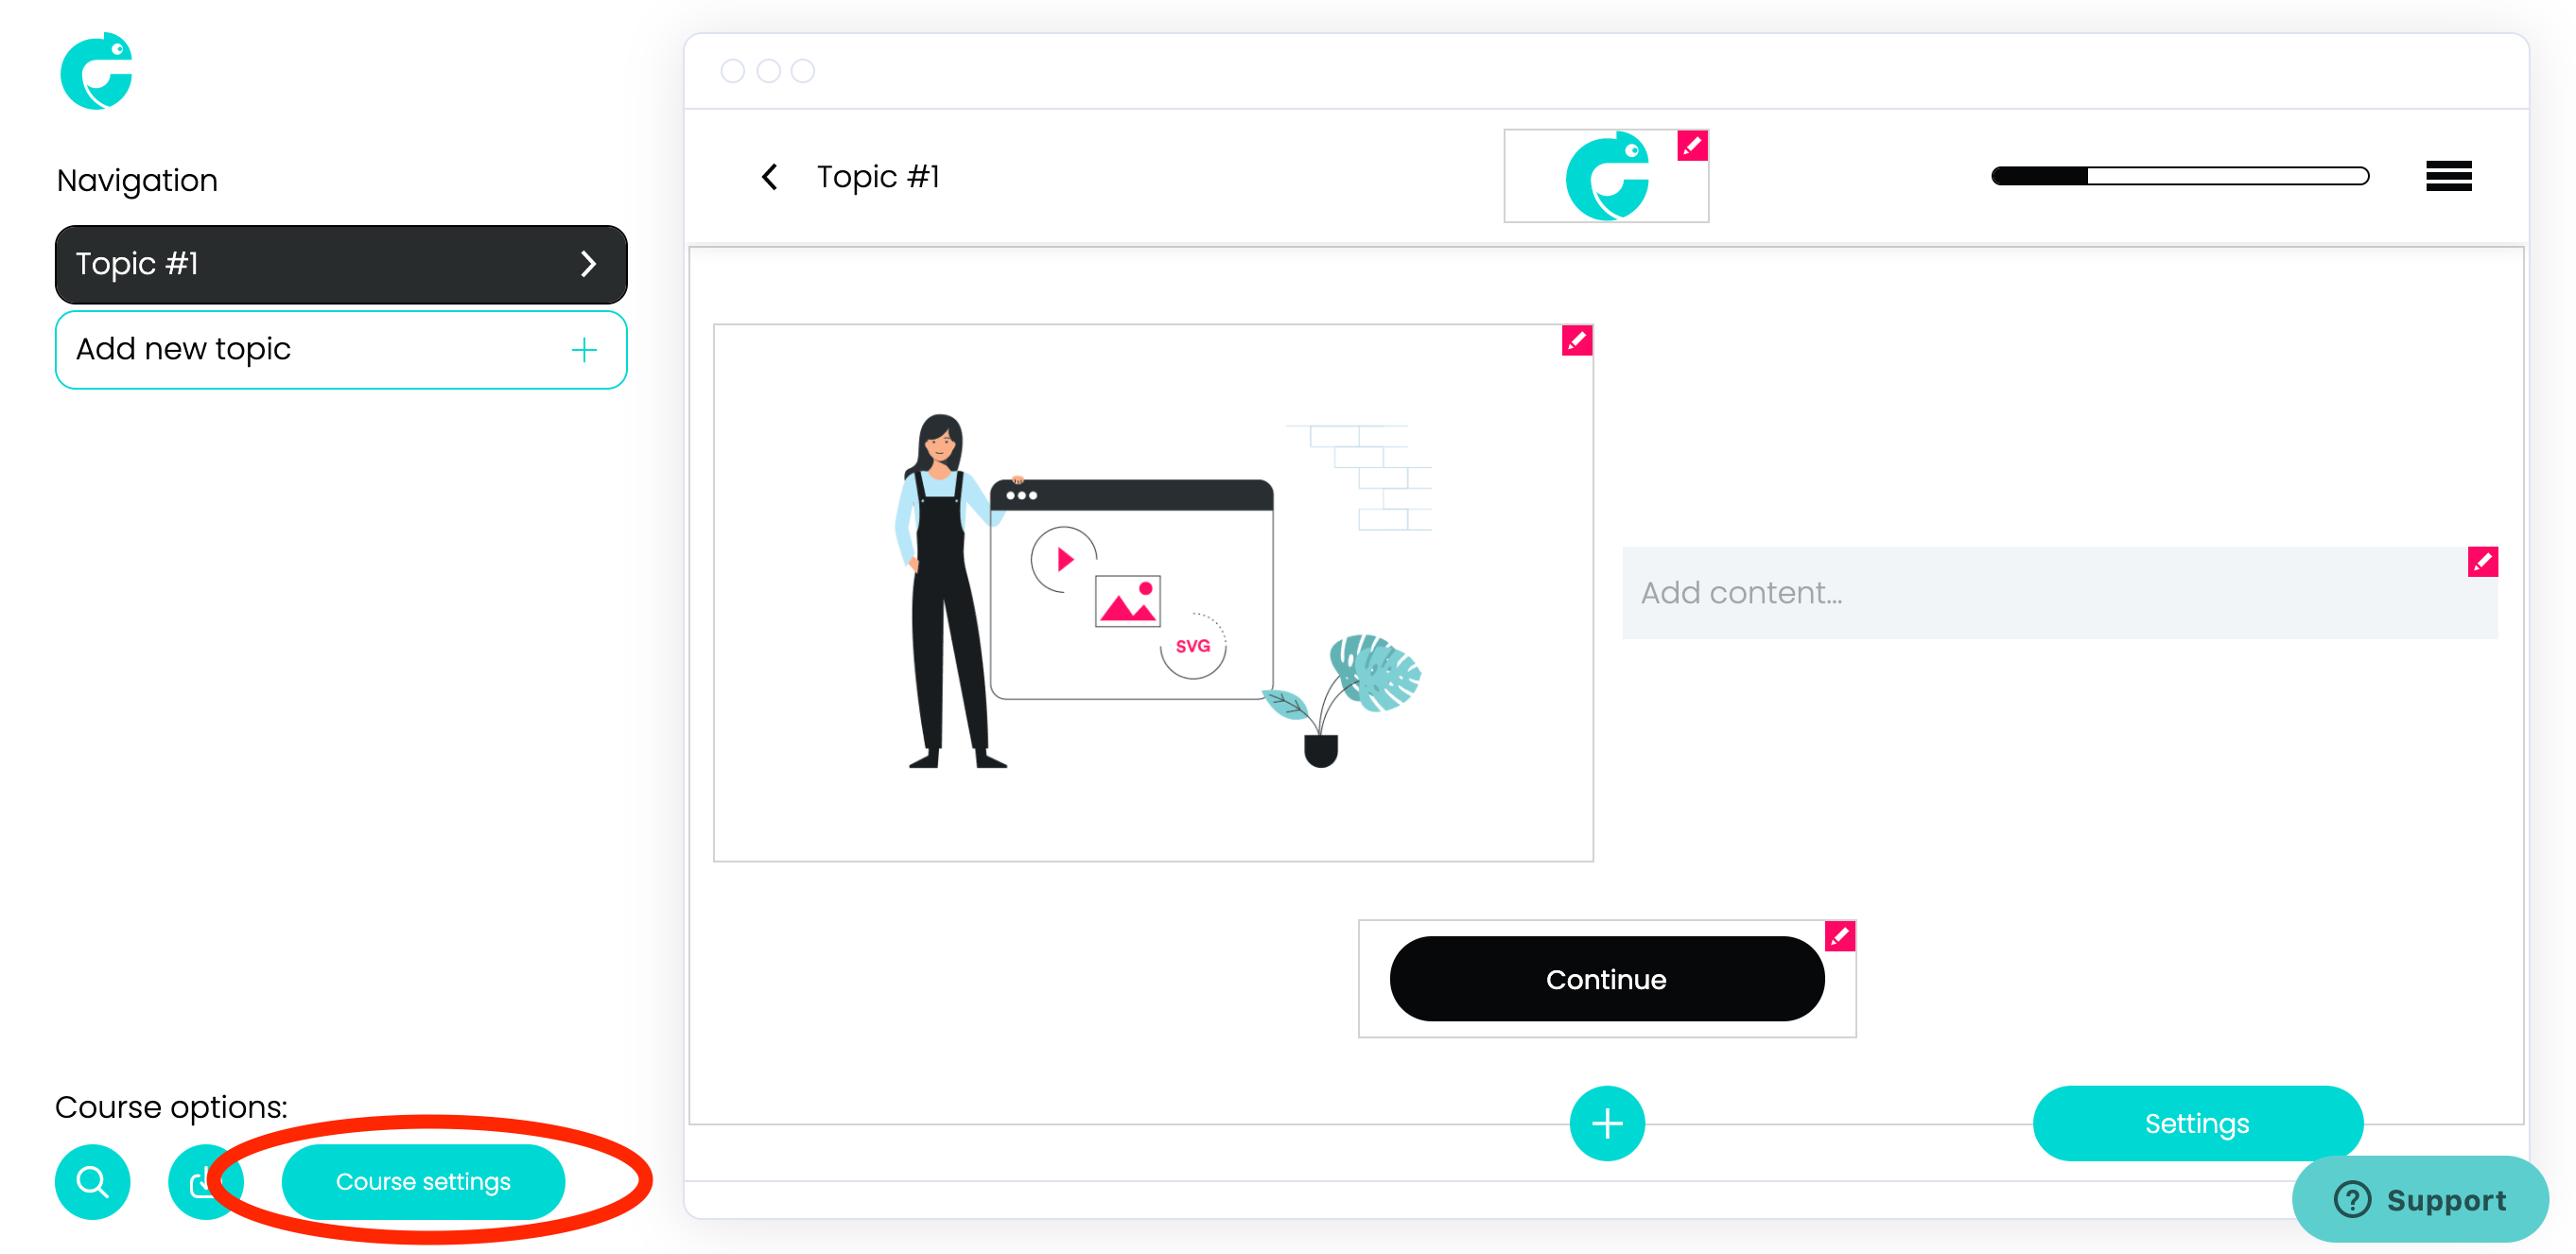
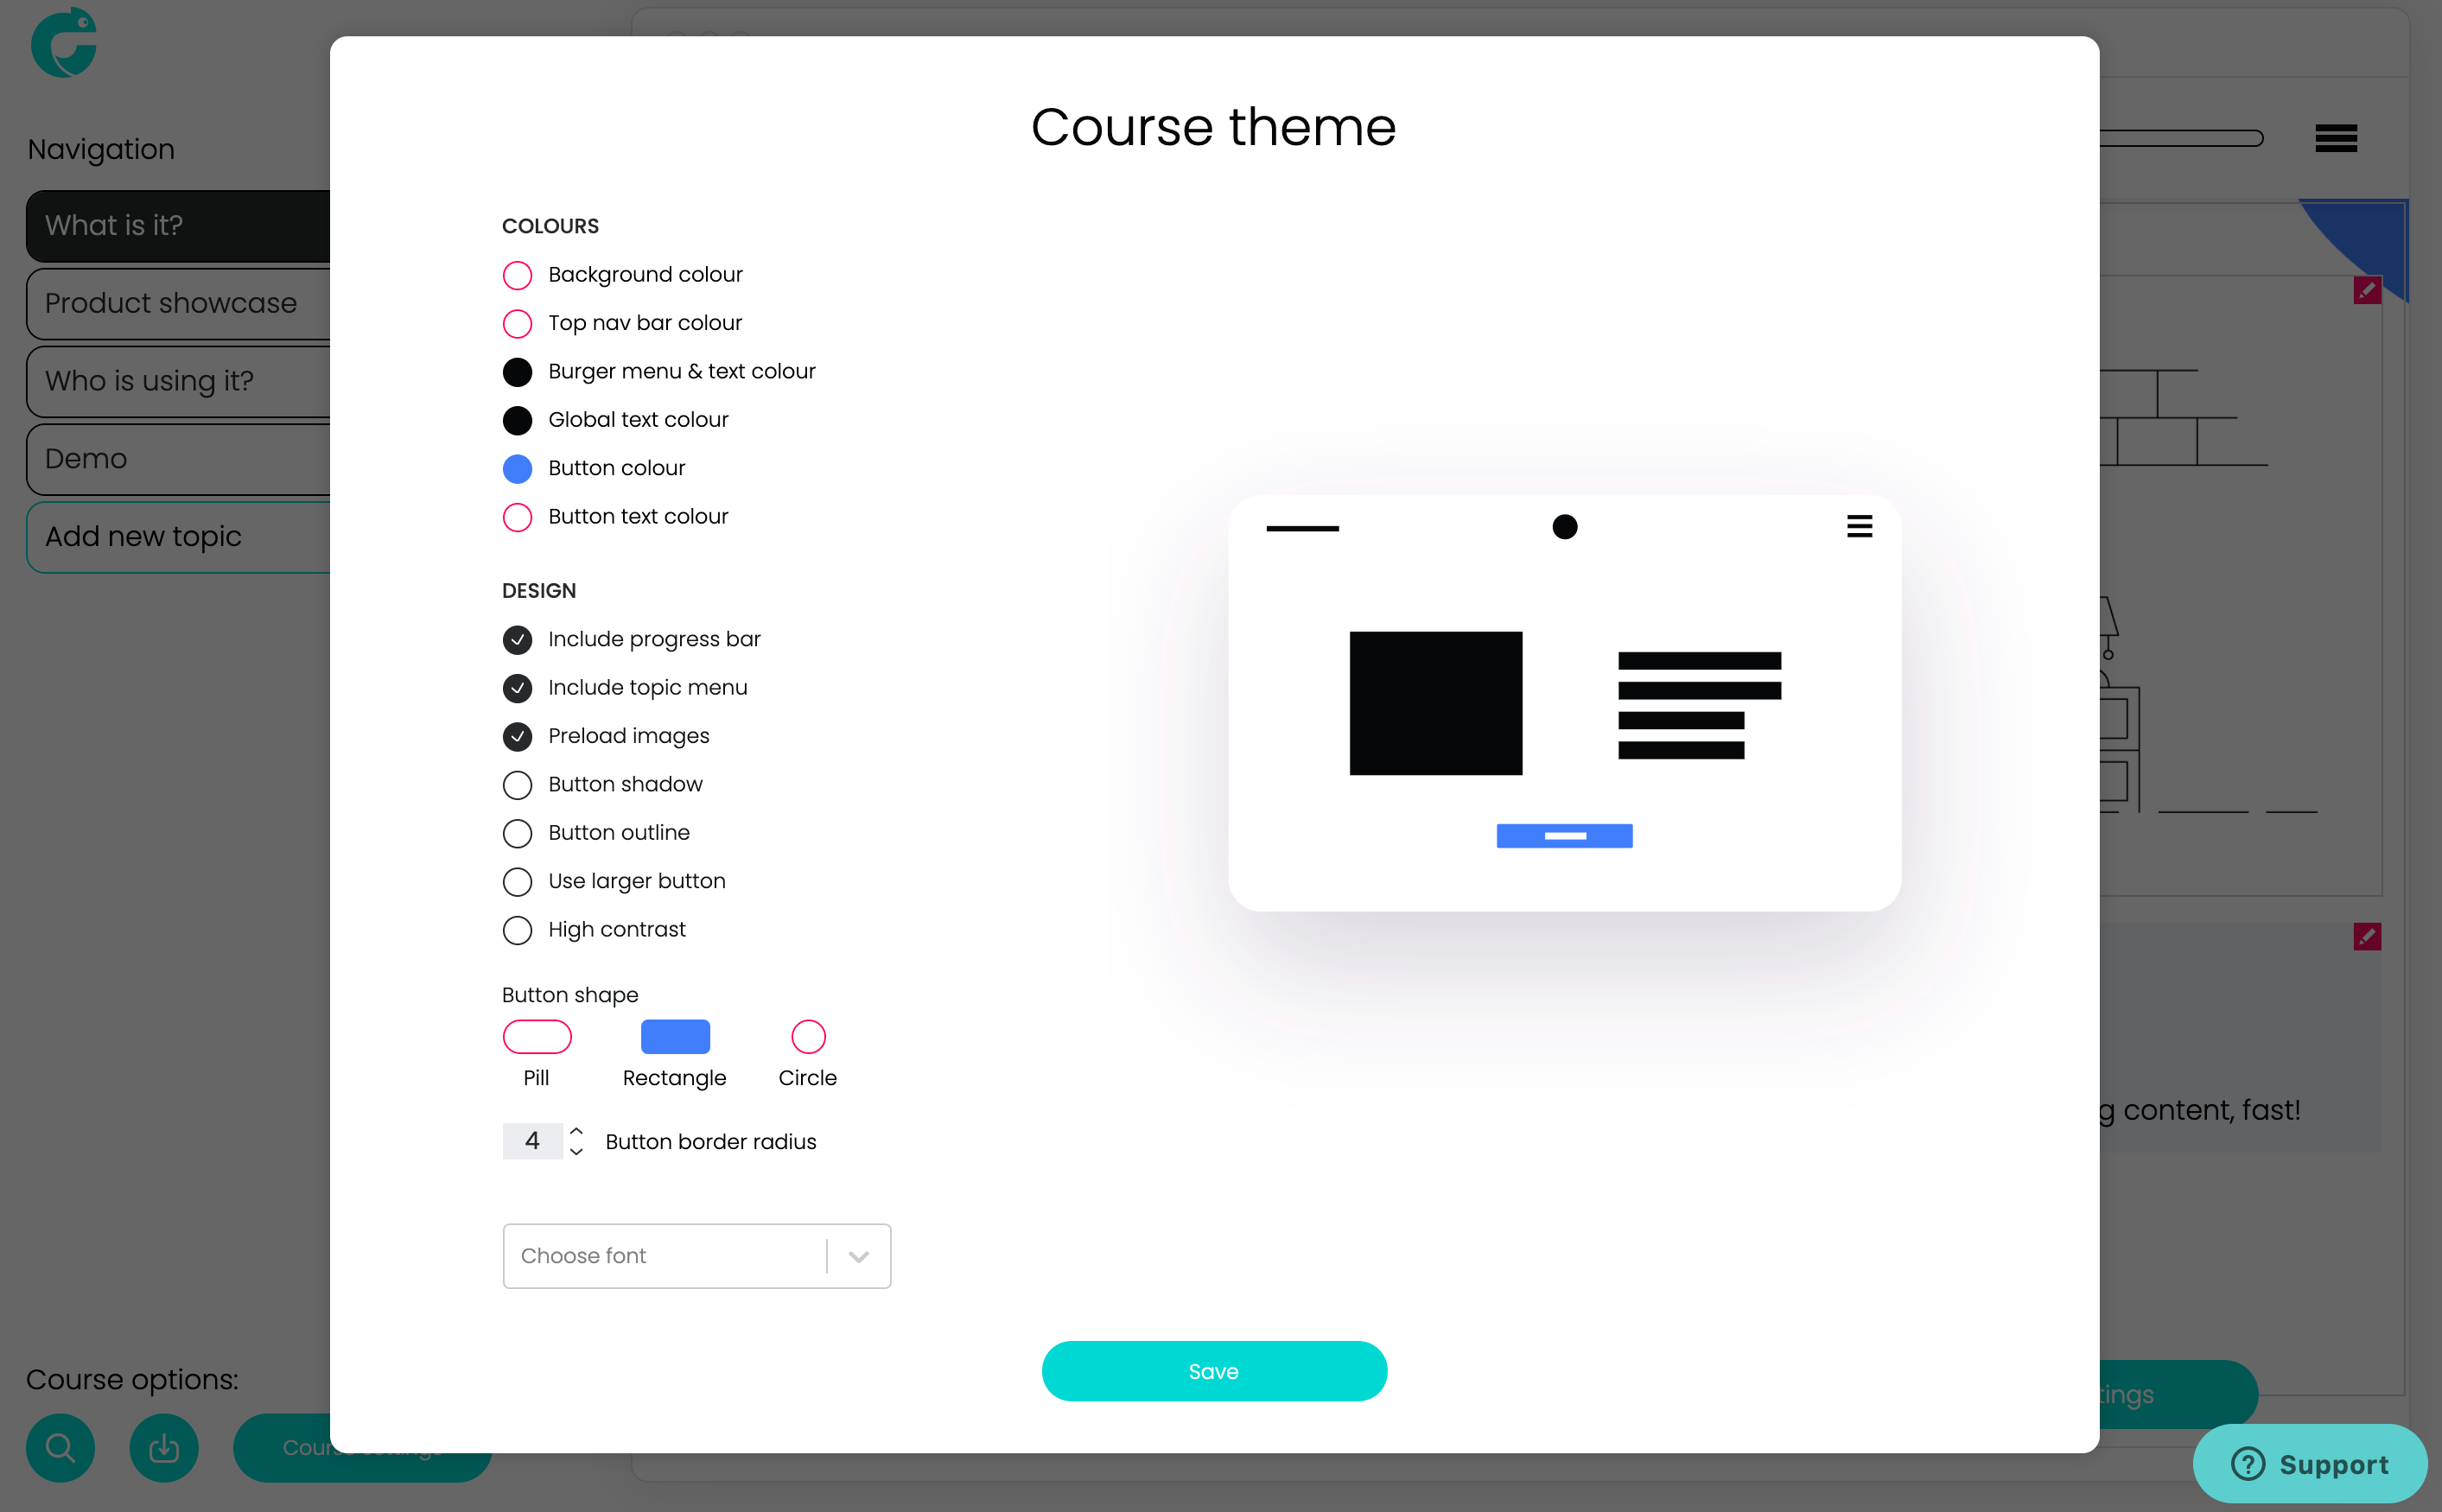
- background colour
- top navigation bar colour
- burger menu and text colour
- global text colour
- button colour
- button text colour.
The illustration on the right hand side will give you a preview of your chosen options, as shown in the image below:
3. Project admin and editor UI
Click here to watch the 'Project admin & editor UI' video, or follow the steps below.
Your dashboard will show your most recent project first, as seen in the image below:

Click on your project to open up the project admin page. This page will display the various project settings, as shown in the image below: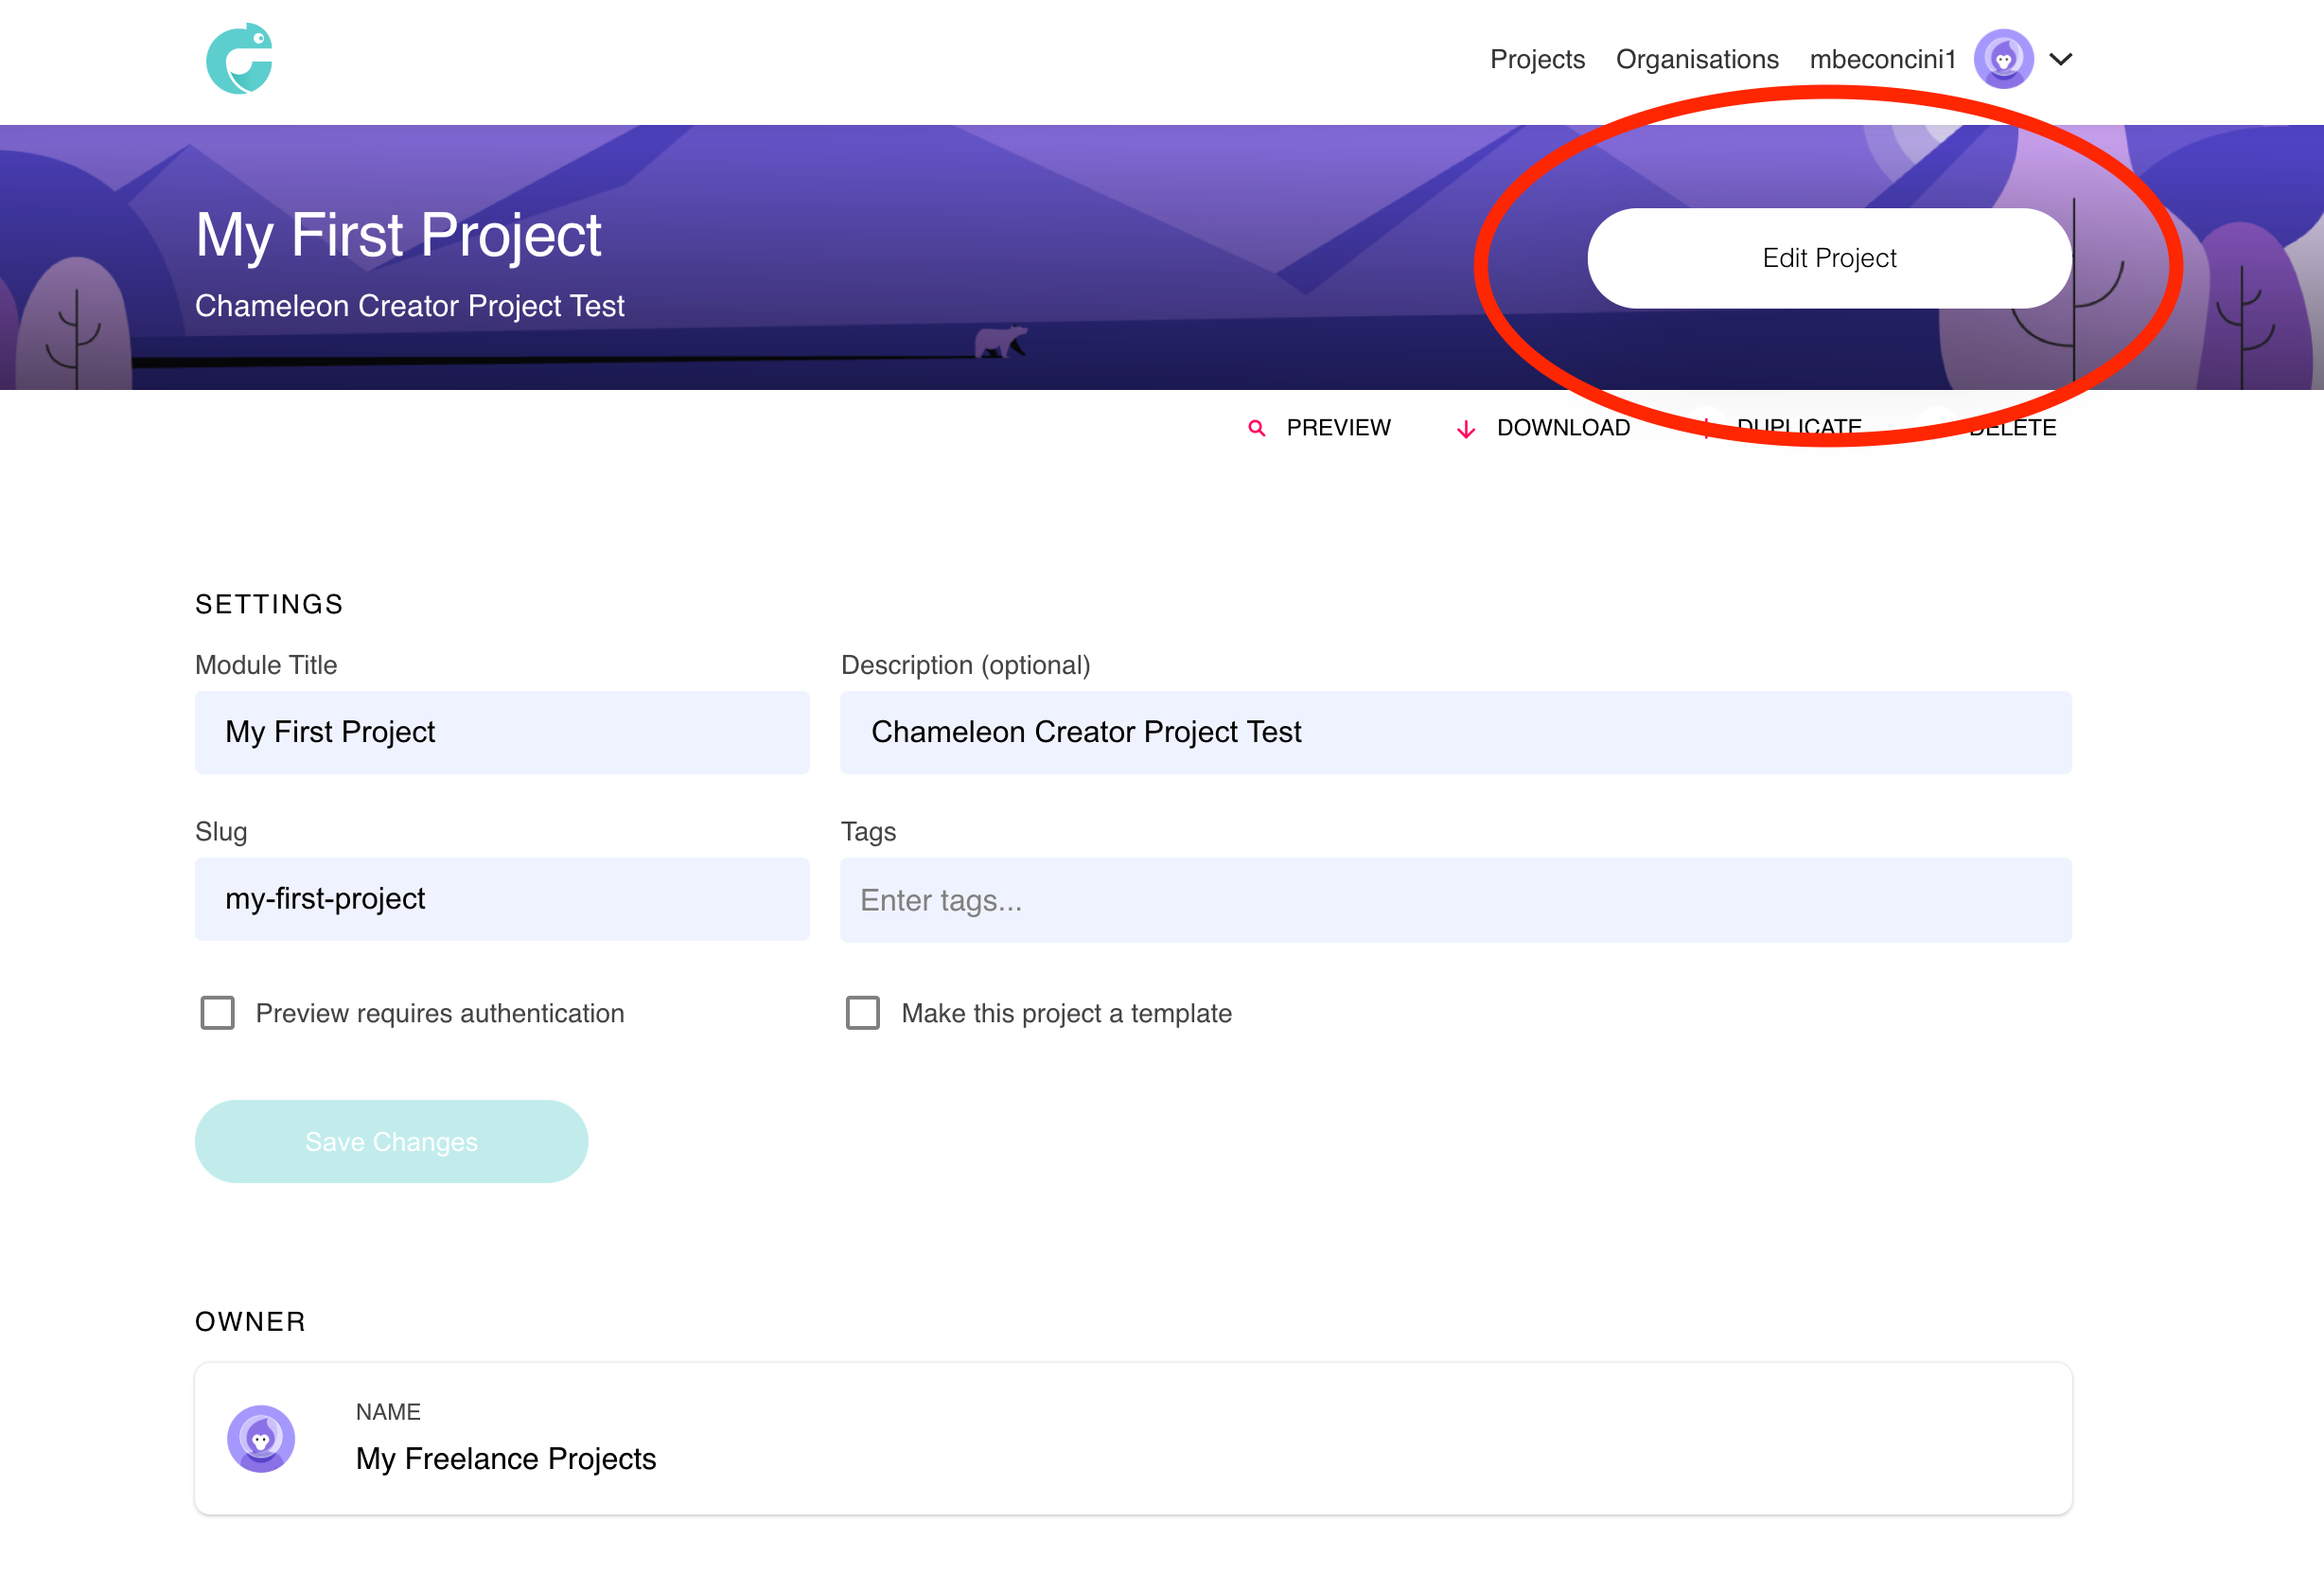
-
Module title: here you can change the name/title of your project.
-
Description: this is an optional field that you can fill in to give more detail about the project for your future reference.
-
Slug: this is the text that will appear at the end of your project's URL.
-
Tags: tags can help you find the relevant projects quickly when searching from your dashboard.
-
-
If you're making any changes on this screen, remember to hit the 'Save Changes' button.
-
-
Click on the 'Edit Project' button highlighted in the image above to open up the editor.
-
3.1 Course options
-
Welcome to Chameleon's editor! From here you'll be building beautiful content your audience will love. Before we jump into the interactions, let's take a quick look at the editor's user interface.
-
In the bottom left corner you will see three icons underneath 'Course options': a magnifying glass, a download button and a course settings button.
-
-
Magnifying glass: The magnifying glass button will open up a new window in your browser, and build a real, working version of your project. This allows you to view and interact with the module just as your audience would. You can send the URL of this preview to your stakeholders, or even to your audience if you aren't bothered about hosting the module elsewhere. This is common for people using Chameleon for communications, or modules that don't need to be tracked/reported on.
-
Download button: The download button opens up the SCORM options
pop-up, and gives you several options before downloading the SCORM package e.g. setting your required pass mark. -
Course settings: The Course settings button opens up a pop-up, giving you various options to edit your project's colour scheme/look and feel. We covered this in chapter 2, so click here to go take another look.
-
3.2 Topics
-
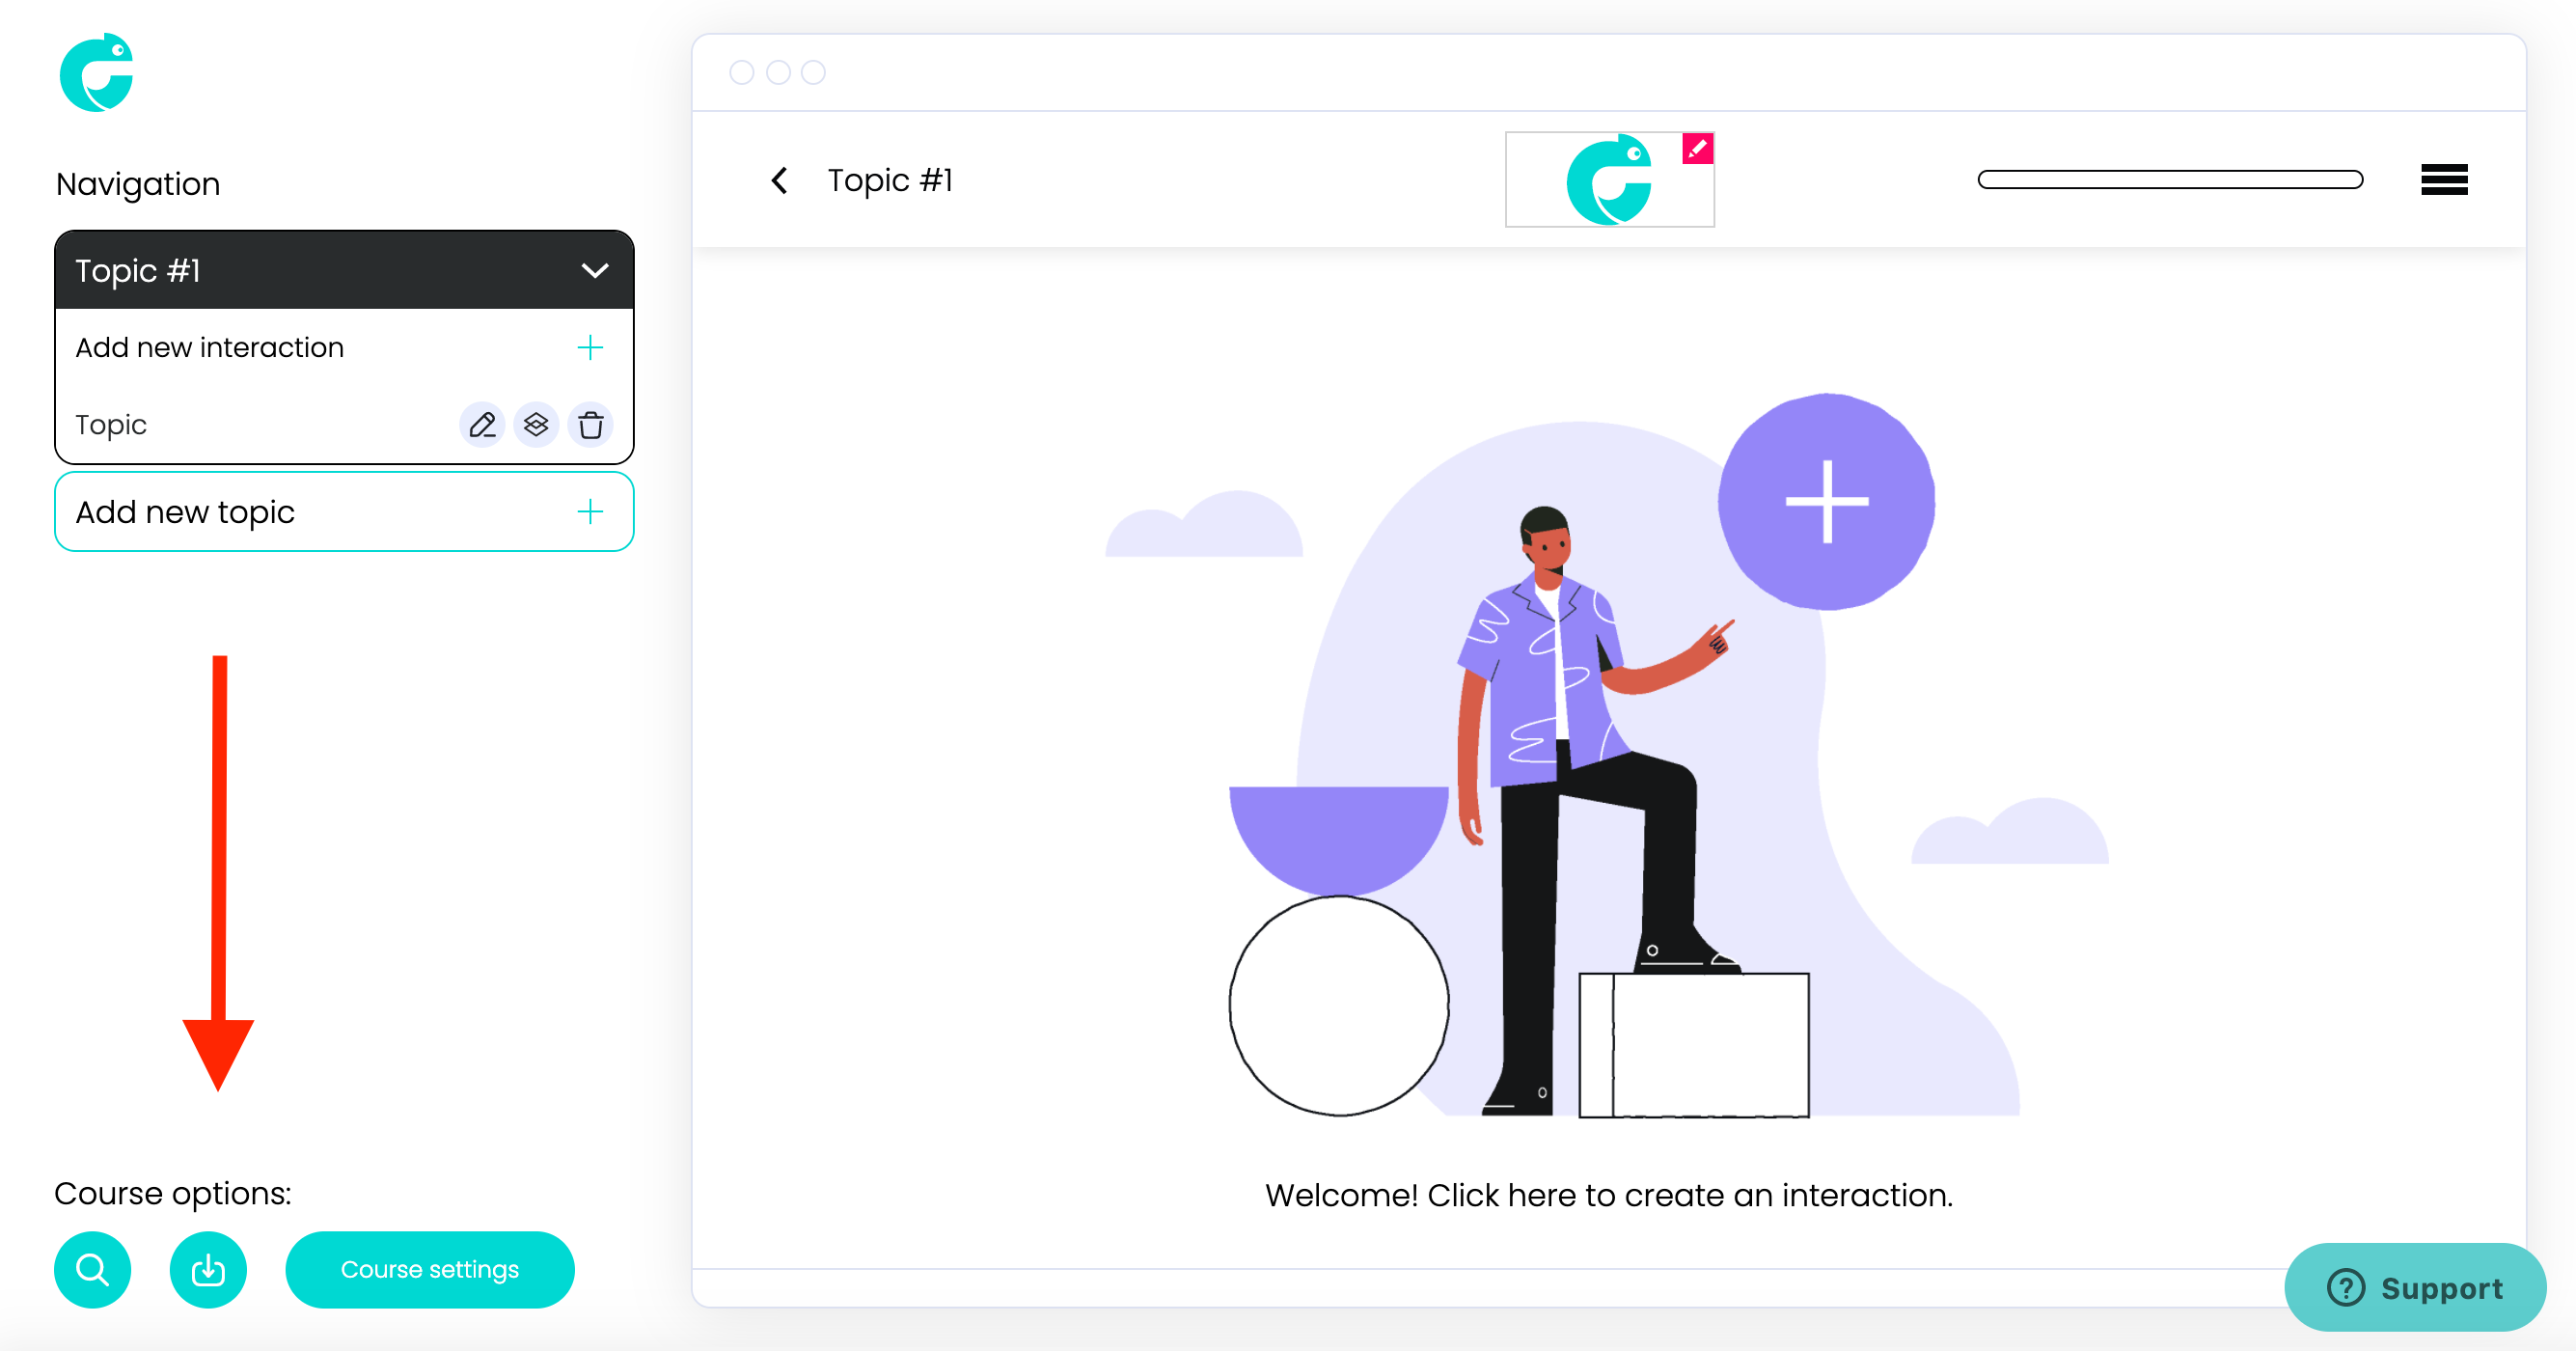
To structure content in Chameleon, we use 'Topics'. Topics are a quick and easy way to segment content for your audience.
-
You'll notice your first topic is automatically labelled 'Topic #1', as seen in the image below:
-
To rename the topic, simply click on the text in the black bar and type in a new label e.g. 'Intro'.
-
-
Your audience will see the names of your topics in the top-left corner of the module.
- The topic labels will automatically generate your burger menu navigation headings.
-
-
-
-
4. Add your first interaction
-
Now this is where the fun begins!
-
-
-
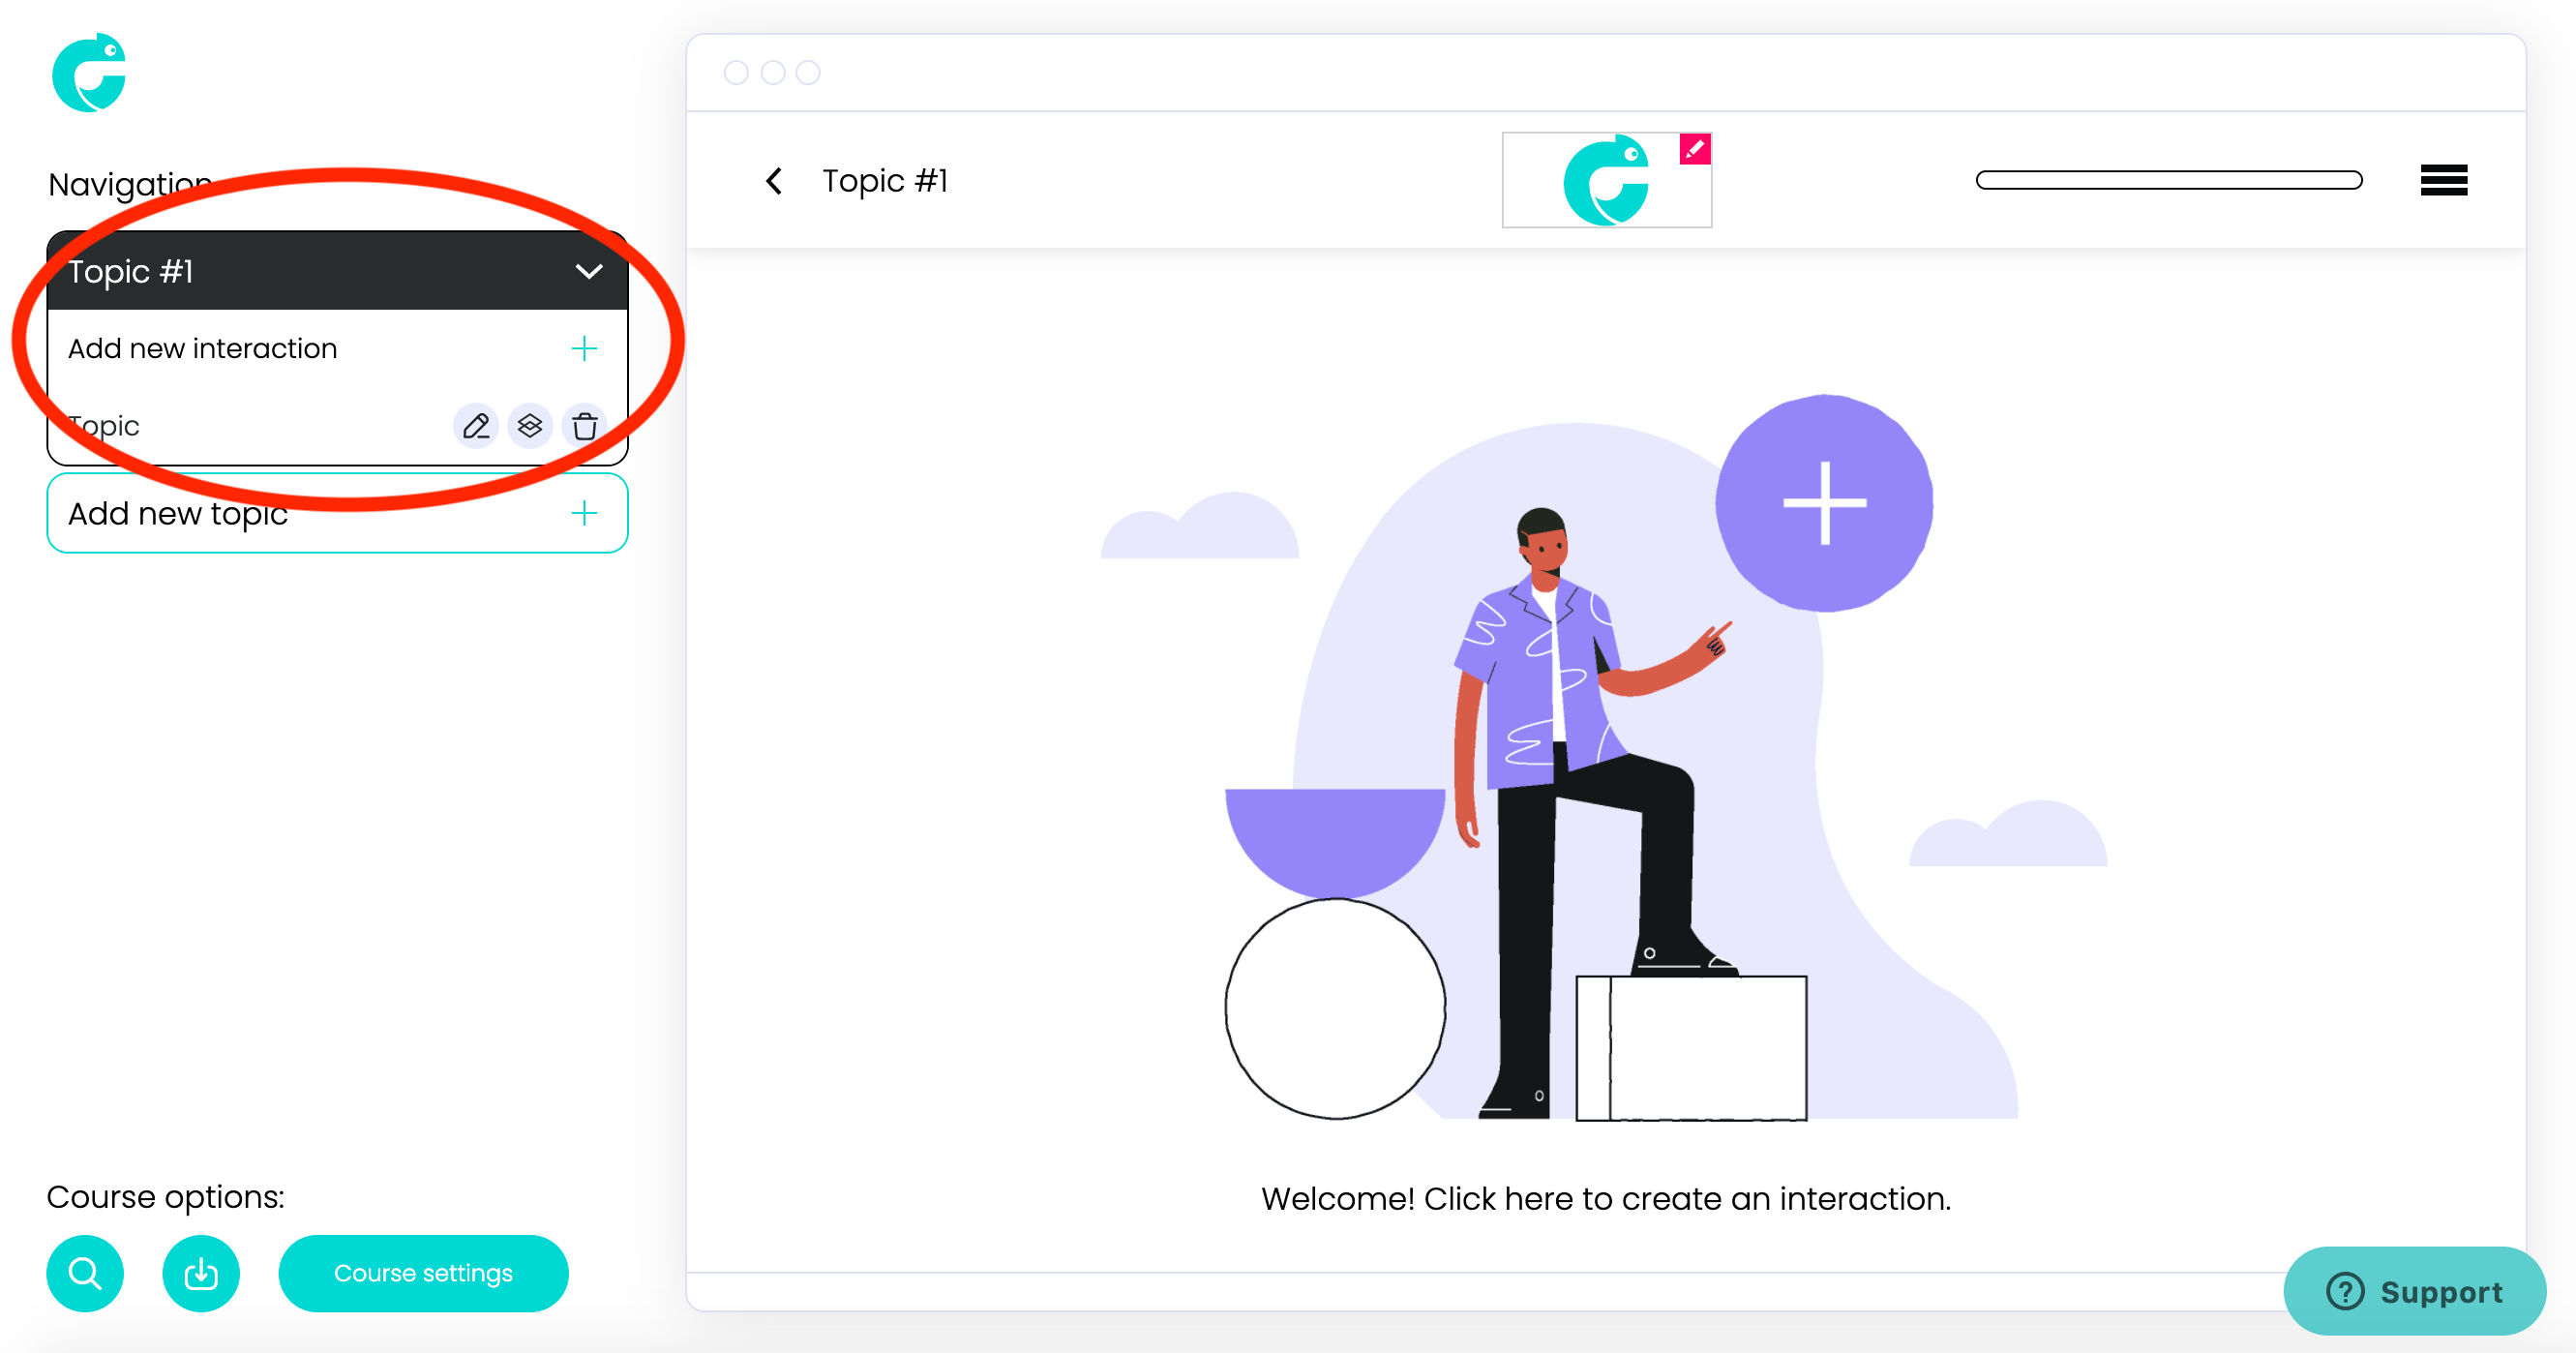
The pages you will build with your content in Chameleon are referred to as 'interactions' (sometimes referred to as 'slides' in other authoring tools).
-
To add a new interaction, click the Add new interaction button as seen in the image below:
-
-
-
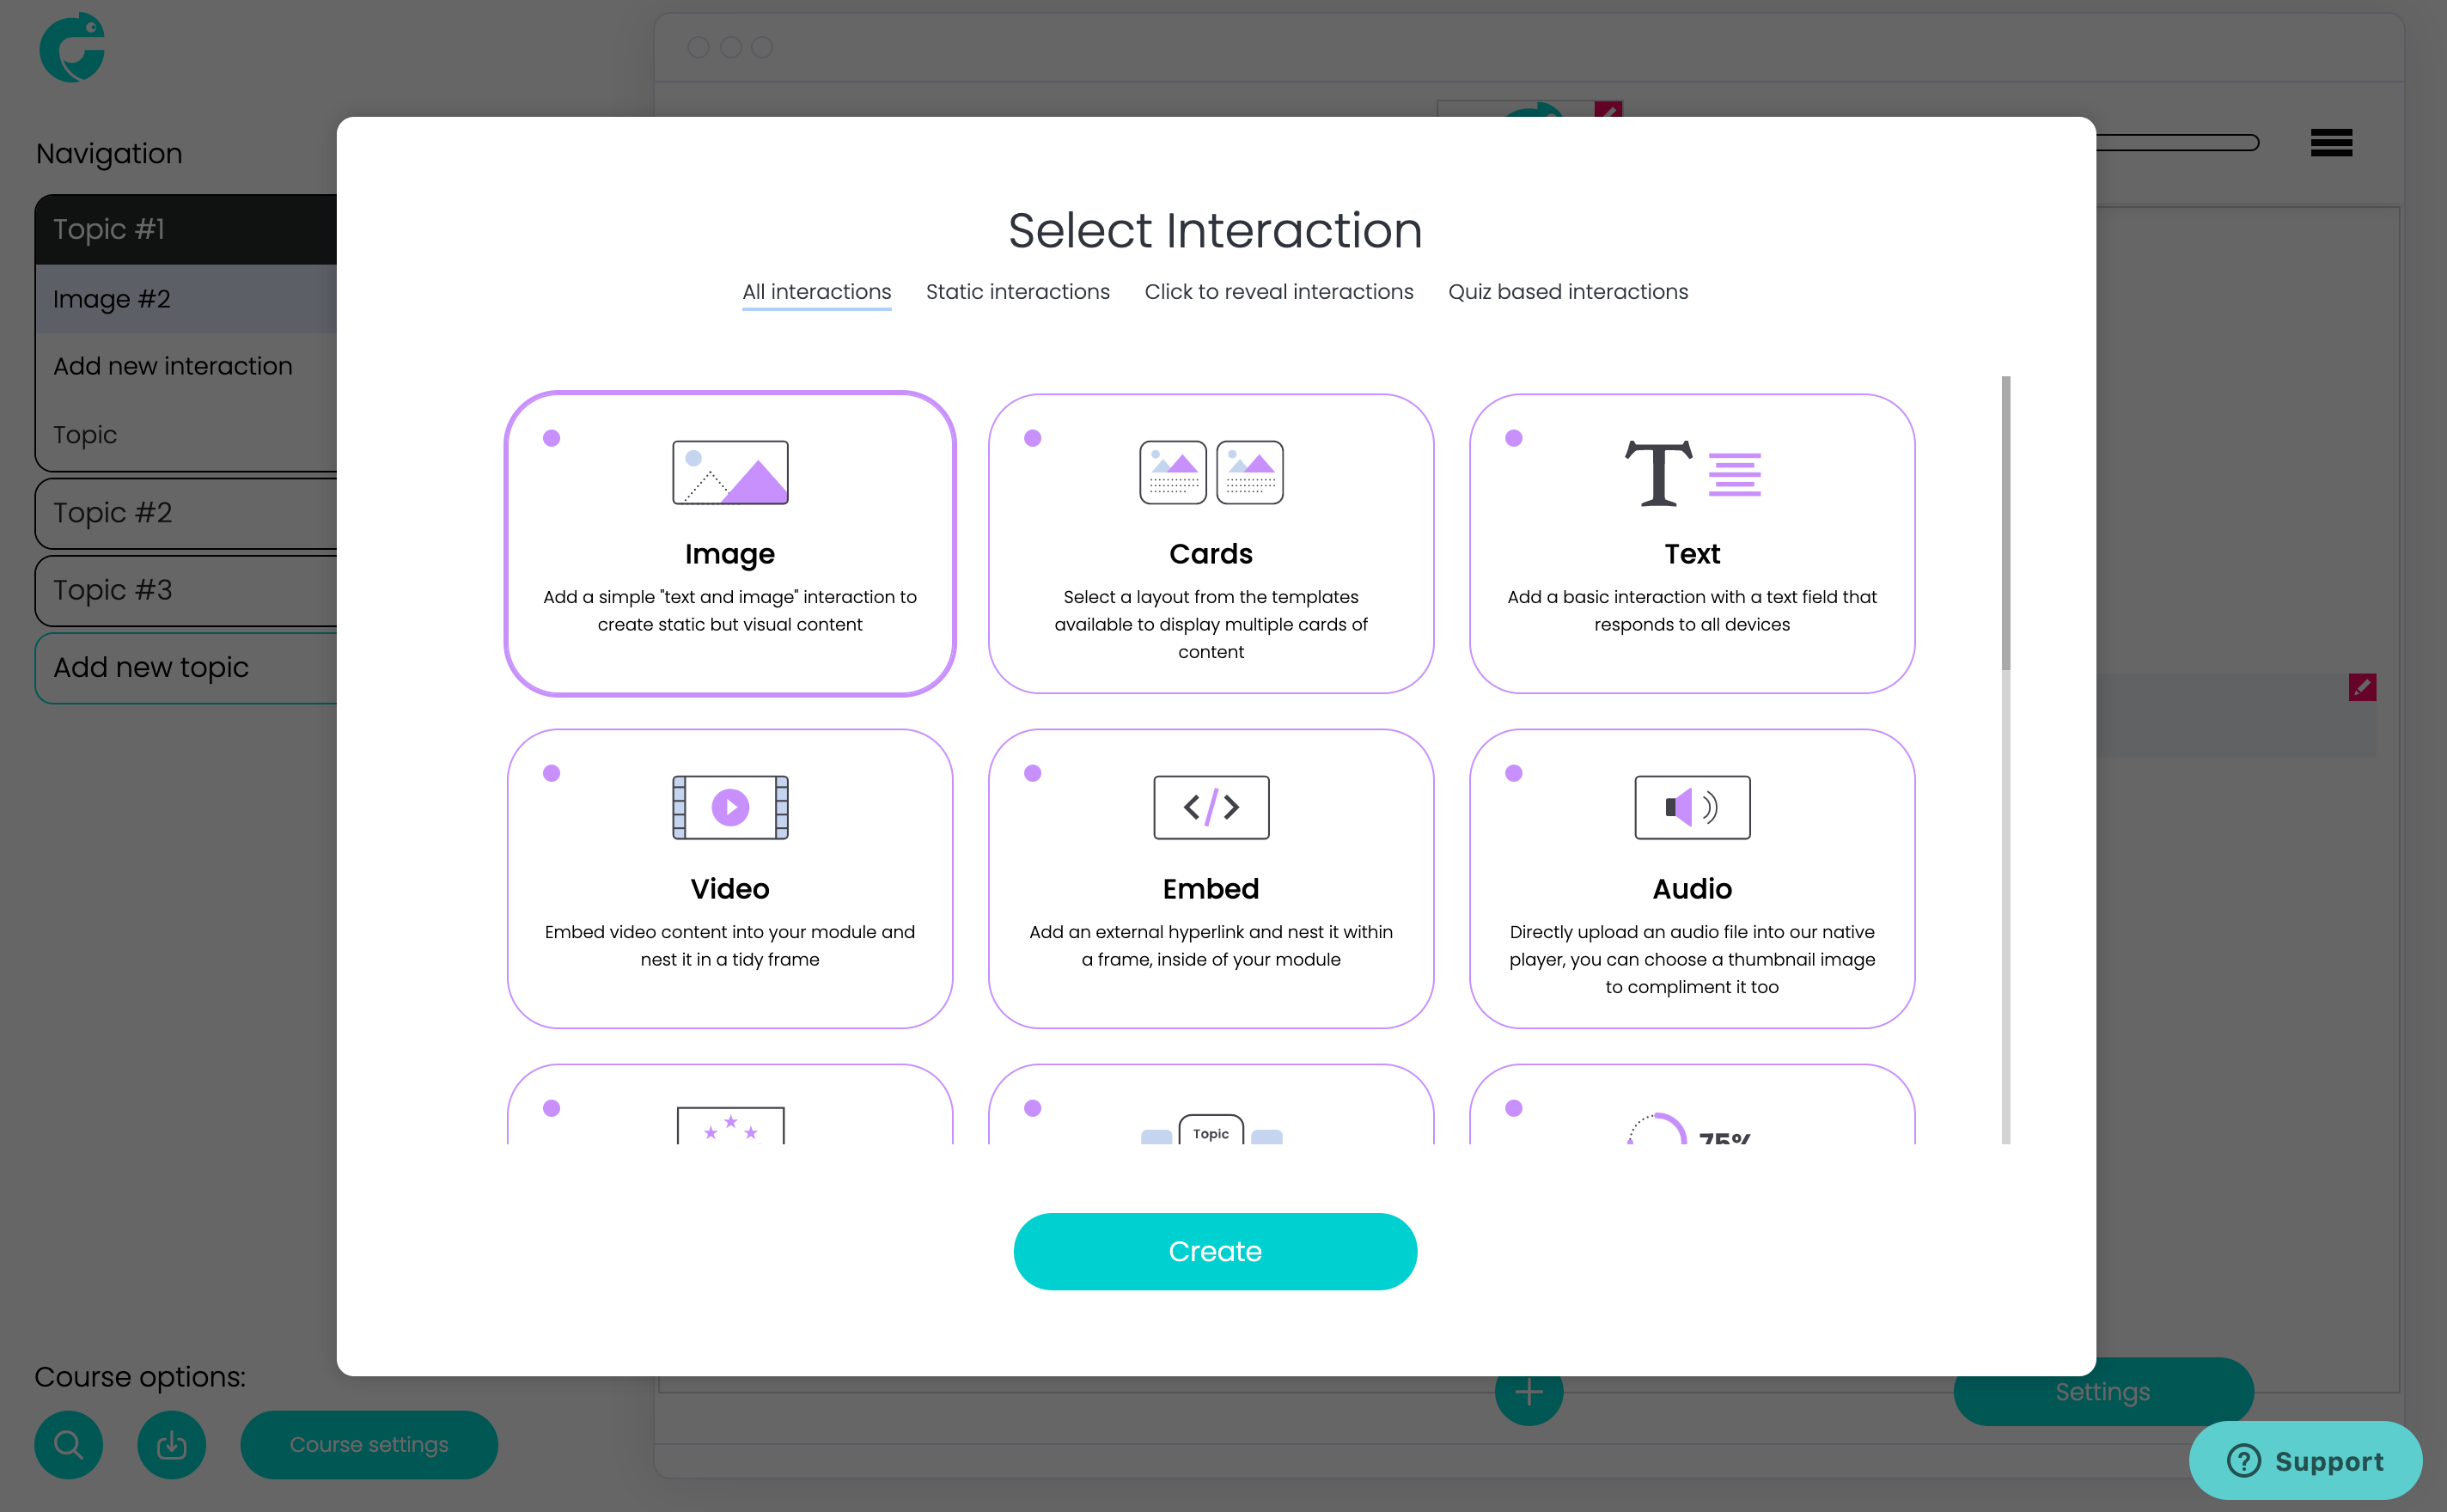
This will bring up the Chameleon interaction wizard, which builds your slides for you, all you have to do is pick the interaction and hit the Create button, as shown in the image below:
-
-
-
Once you've added your first interaction, all you need to do is start adding your imagery/illustrations and your content.
-
If you want to change the way the interaction behaves, just click on the object you want to edit, and the relevant styling tools will appear in the panel on the left of the screen.
-
-
4.1 Editing tools
-
You may have noticed that in the editor, you can't see any editing tools. That's because we've adopted a user experience (UX) method known as 'contextualised navigation', which is a fancy way of saying you only see the tools you need when you need them.
-
To edit an object in Chameleon, i.e. an image or text, simply click on the object, and you will see the panel on the left of the screen change to the relevant 'styling tools', as seen in the image below:
-
-
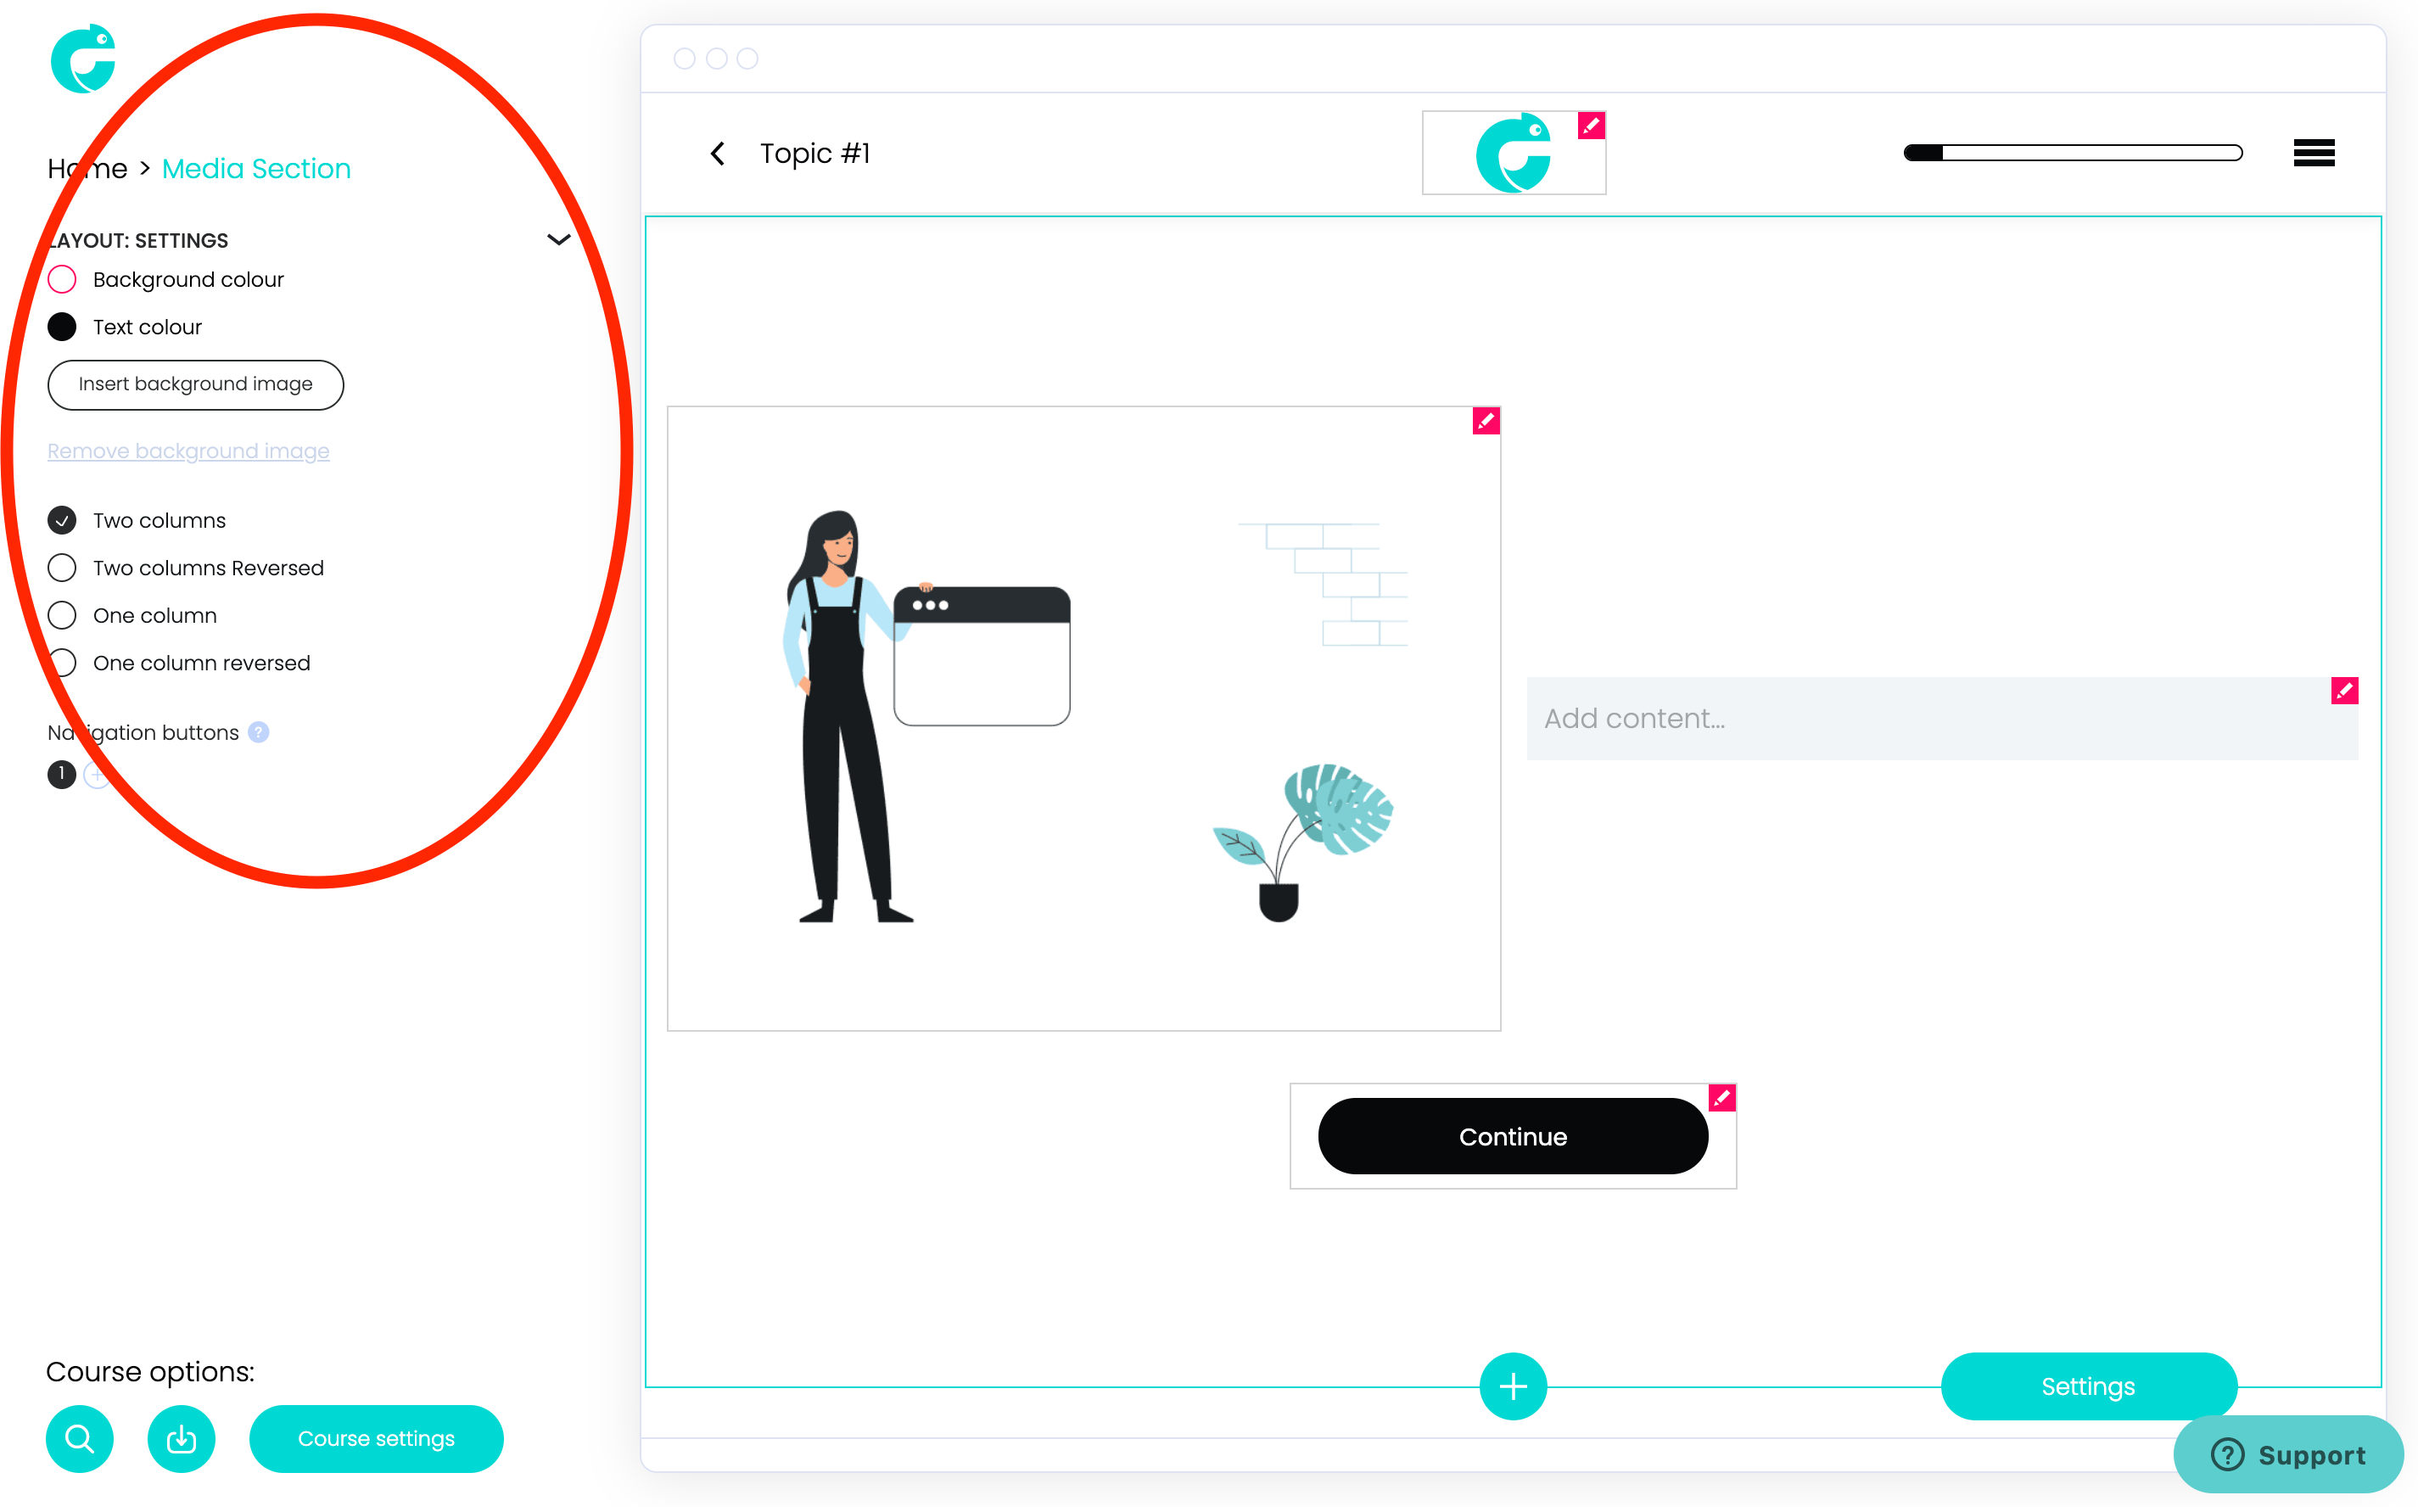
-
To make edits to the interactions themselves, click on the pencil icon next to your interaction from within the topic, or hit the Settings button in the bottom-right corner of your slide.
-
-
-
Well, that's it for now!
-
Hopefully that's helped you get up and running with the basics. We highly recommend checking out our next guide on 'Interactions', as this will show you how each of our interactions works, and when's best to use them.
-
If you've got any questions that aren't covered here, or if you want to give us any feedback on this guide, please click here to flick us an email.
-
Next guide:
-
Chameleon Creator Interactions
-
At the heart of Chameleon are our three guiding principles: 'Easy, Fast and Beautiful'.
-
We wanted to make manually scrolling and setting up triggers a thing of the past, so we created a wizard that builds your interactions for you in just a couple of clicks.
-
To show you how all of our interactions work, and when may be best to use them for top-quality learning design, we've created another guide for you called 'Chameleon Creator Interactions'. Click here, or on the image below to check it out.
-1.jpg?width=1920&name=Email%204%20(2)-1.jpg)
-